
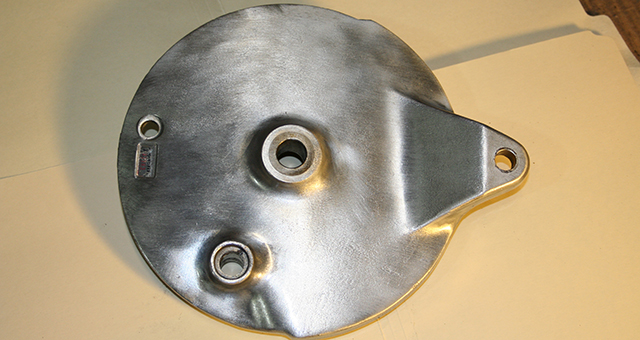
Over the last week I devoted many hours to Mia Wallace and unfortunately have few presentable results to prove it. In short, I started painting many of the bikes accessories. The problem with painting accessories is that it takes hours of preparation to get each item in shape for painting, and several hours more to complete the painting. Despite a solid week I’m left with just a few parts to talk about. Sure they look nice, and pictures do not do them justice, but paint preparation is a boring topic and an even worse job. Suffice it so say, the front and rear hubs are painted, the cylinders are done as well, and I have finished up the side cases, clutch cover, and stator cover. The cylinder heads are the only remaining engine items to get painted, but they need yet more preparation before I can do that. The biggest caveat is that with the arrival of the spokes and rims I am now ready to lace wheels. If you are wondering where the frame is at in this discussion, currently I am planning on powder coat for it, but there is fabrication to be done before that will happen.
On the topic of painting, or more like painting preparation, I started filling the gas tank and headlamp bucket. In previous posts I mentioned that the tank was a little lumpy. In fact, I discovered extra body filler beneath the paint when I stripped it. I like the look of the stock tank and decided to keep it. I pulled the dents as best as possible without creating high spots. After that, I started filling and repairing the body fill that I had damaged. Again, this is a process that it is very time consuming and produces very little end product. Once I get the fill completed I will provide some pictures, but I need to sand and fill about five or six more times before that will happen.
The big news for the project is that I finally procured a working fork package for the the front of the bike. Fixing up the stock RD350 forks was proving ever troublesome. It was beginning to look like a proper rebuild was going to cost up to twice as much as other options and sadly the 34mm RD350 forks are a bit noodly in the first place. My racing background has taught me to never be satisfied with suspension performance and I’ve always hated the ride of overly flexible forks. At the end of the day, I know that I wouldn’t be satisfied with my RD350 unless I made an upgrade at the front. I was again faced with further research.

More than a few serious hours of searching made it obvious that there are two common front end swaps for the RD350. More exotic swaps exist, but I’m not that good yet. What appears to be the most common front end swap is the XS650 fork, which is marginally larger at 35mm. The XS650 has a huge following, those bikes get turned into everything from choppers to cafe racers. As a result, XS parts both new and used are abundant and cheap. The other common swap is the FZR600 fork. It’s a 38mm fork. It was used on the FZR from 1989 to 1999. Again, it is easy and cheap to get parts for the FZR fork. Installation for either set is reasonably straight forward. Though there are differences, and both require machining some spacers and various bits. I looked high and low for both sets just trying to find a decent set at a decent price. I preferred the FZR forks for performance and the XS set for ease of installation. I guess I got a little zealous and I ended up with a nice set of both XS forks and FZR forks. I haven’t figured out which set I will use yet. There are just too many factors to weigh at this juncture.
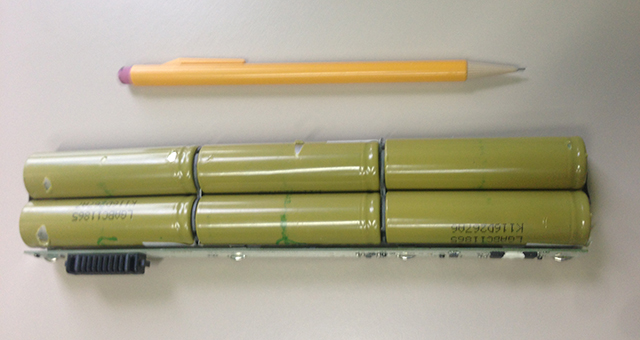
In other news, I finally made progress on the battery. I looked across the web for motorcycle batteries and do it yourself lithium-ion packs and finally arrived at a good compromise. There are many posts and articles on the topic, but finding the right information is time consuming. The most common DIY pack uses an A123 26550 cell. This is a 3.7 Volt cell that is about an inch in diameter and about twice that in length. It’s a great cell and at around fifteen dollars a cell is fairly affordable. Keep in mind these cells are extremely high performance and come in a very small and light weight package compared to lead acid variants.
For my build, only four A123 cells are required. For bikes with electric starters, eight cells are probably appropriate. The issue I have with the A123 cell is it’s physical size. The A123 cells assembled into a pack of four ends up being fairly large. That’s a concern for me, I am looking to keep my bike as minimal as possible. Moreover, the RD350 does not have an electric starter, and I am replacing all of the lights except the headlight with LED replacements. Most importantly, the battery energizes the coils to allow the bike to start when I muster up the strength to turn it over via the kick-starter. The battery also serve as a mediator between the charging system and the electrical components, but the charging system is always on during operation. In summation, I need voltage not amp hours.
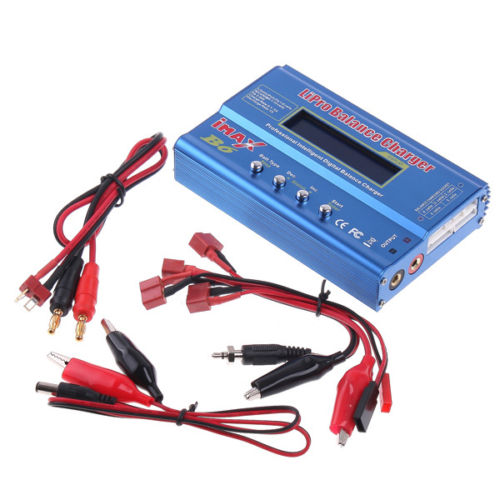
Given the overall demand on the system should be reduced I have chosen the 3.7 Volt LG-ABC11865 battery. This battery is common in laptops. At about 2.5 inches long and .65 of an inch in diameter it is a compact unit. Four of these batteries in series will provide me with the 12 Volts I need to operate. It just so happens that I saved a working battery from a laptop that had been destroyed. That’s what I call a freebee. In conjunction with the battery pack I sourced an Imax B6 charger. The charger gets good reviews all over the web and only costs about 25 bucks. It will load balance as well, which is a nice feature for li-ion batteries.
To conclude this weeks article, I want to revisit the engine discussion I had last week. Specifically, I finished off my previous weekly report by mentioning engine squish. I discussed that I was going to modify it as well as change compression. I’ve had a change of heart. The engine has a mild build as right now. The ports, reeds, carburetors, and expansion chambers have all been changed. The ignition is going to be electronic as well. There are three reasons why I am leaving the head and compression alone. Firstly, I did not do a full crank rebuild and I believe it is unwise to increase bottom end load until I have. Secondly, I’d rather send an untouched head and cylinder to a builder down the road to get a proper build top to bottom. Thirdly, the bike is going to be too fast for me anyways. In the long run this is the right decision for the project. I get excited sometimes and want to go for that extra horsepower, but this is the better option for now.
Be sure to leave some comments or ask some questions. The project continues to be a fun adventure for me, and I hope you will return to read my future posts.
This weeks parts:
- XS650 Forks with Triple Trees – Used – XS650.com
- FZR600 Forks with Triple Trees and Brakes – Used – Craiglist (local buy)
- Imax B6 Charger – New – Newegg.com
- LG Laptop Batteries – Used – An old laptop battery I had
2 Responses
pete
Im building. My 1974 rd350. Just sent barrels off to spec 2. Can i call if i need help.?
Chris
Hi Pete,
Check out http://www.2strokeworld.com – It’s the best web resource I know of for RD350 information. Lot’s of helpful guys there.
-Chris