
I’ve arrived at the 5th installment of my near weekly series featuring my Cafe Racer build. It hasn’t been exactly five weeks since I started working on the bike, it has really been about a month, but time has been flying. Now, you may be wondering why there’s a picture of Uma Thurman at the top of my post. While yes, that is Uma Thurman, more importantly she is Mia Wallace from the cult classic Pulp Fiction. As my friends know, I’m a firm believer in naming my vehicles. If I am going to live and potentially die by my machine, the least I can do is name it. It’s all about respect. There was Mrs. Draper, my beloved Van Diemen. Princess Vespa, my much maligned RFR. Now, my RD350 is Mia Wallace. If you are familiar with Pulp Fiction, you can likely hypothesize as to my reasoning.
At this juncture I have made significant progress on the bike. Some of the components were thrown out, some of them sit in waiting, and others are in the process of being restored. The project thus far has been very enjoyable. It’s amazing how much easier bike projects are in comparison to open wheel race cars. Every component is just smaller, lighter, less expensive, and easier to deal with.
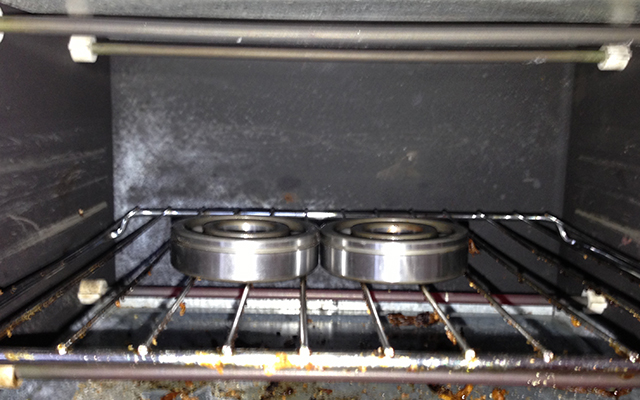
The cylinders have been ported and the piston and gasket set have been ordered. In anticipation of completed cylinders I really got moving on the rest of the bottom end. I installed the new bearings and seals on the transmission internals as well as the crank. As I’m only doing the outer main bearings I avoided the hydraulic press completely, instead choosing the heat method. Over at the John Walko Racing shop we used the oxygen and acetylene torch to warm the old bearings up just enough to lift them off. It took about 20 seconds for each bearing. I lifted each bearing off the crank with a screw driver. Easy-peasy. Back home, I reversed the process with the new bearings. This time however I used the gentle heat of toaster oven rather than torch. I set the toaster oven to 250 degrees Fahrenheit and set the timer for 10 minutes. That didn’t quite do it, the bearings would slide onto the crank but wouldn’t fall all the way on. I cranked up the heat to 300 degrees Fahrenheit. No problem after that, both bearings dropped on easily.
There was every reason to assemble the transmission and bottom end at this juncture. I cleaned the mating surfaces thoroughly using a wire brush, an acid based cleaning solvent, and some paper towels. I cleaned the surfaces that the bearing and seals mate with as well. I then test fitted then entire operation. I wanted to get the bearing orientations correct, make sure the seals were all in their proper locations, figure out shift fork and gear placement, and make a plan for assembly. I then cleaned the bolts, nuts, and studs, and coated them lightly in anti-seize grease. From there I laid down a comprehensive but thin coat of RTV on all of the mating surfaces, carefully assembled all of the pieces, and then slid the top case onto the bottom case. I then installed all the bolts and nuts finger tight before methodically tightening them in a criss-cross pattern. To finish, I cleaned up any excess RTV that squeezed out after tightening. That completed the assembly on the bottom end and transmission mechanicals. There is still work to do on the generator, coils, regulator, and points replacement, but that’s another topic for another day.
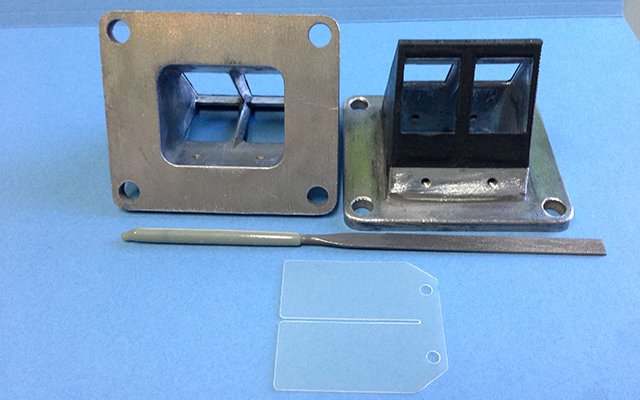
It won’t be long until I am in a position to assemble the top end of the engine, in the mean time I wanted to finish the remaining intake components. Since my YZ125 reeds showed up a few weeks ago working the reed block seemed natural. The factory reed block castings are a little rough around the edges. They have casting marks on the the bridges and leave rough overhangs around the openings. You have to be careful when blueprinting reed cages with large openings and thin reeds. If you take off too much closing surface you risk leaving the reeds unsupported. This causes two issues, first the reeds will have higher failure rates and second they will seal less effectively. The RD350 cage is tiny by many standards and the YZ reeds are thick compared to some I’ve seen so I don’t think I have to worry too much. To clean the cages up I just used a two-dollar points file that I picked up at my local Napa store. After about an hour of filing the cages look sweet! It’s tough to see in the photos, but the edges have been streamlined and air flow will definitely be improved. Even if it is a very minor improvement, it just feels good to know that it was done right.
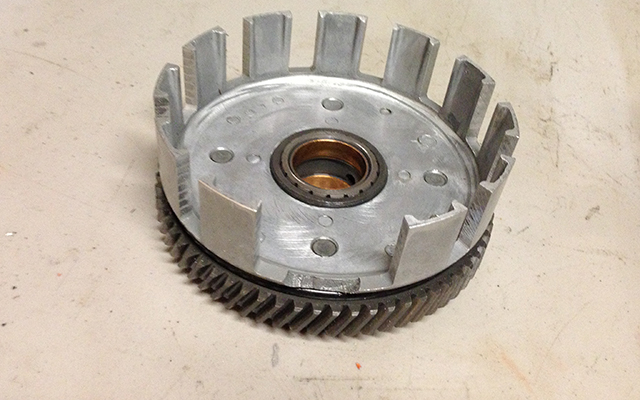
There was one small setback in the project. As I was completing the transmission and slowly installing the various bits I decided to start giving the clutch a little closer look. I hadn’t really looked it over before, though I did think it was in pretty decent shape. The basket itself looked especially good with little or no wear on the basket fingers at all. However, I caught that one of the basket fingers is totally missing. I have no idea where that finger got to, it wasn’t inside the cover when I disassembled it, but it is clearly broken off. I wasn’t planning on a clutch replacement, it simply wasn’t in my budget. Alas, there was bound to be a few unpredicted costs in a project like this. The fact that I got a nice used clutch complete with disks on eBay for 11-dollars is just the icing on the cake. Party on!
Now that a fair amount of the engine madness is taken care of I will start giving the frame, suspension, and brakes more of my attention. This is a critical juncture. I plan to make frame concessions to accommodate rear-set pegs and controls, but it is tough to tell where to place my rear-sets if I don’t have hand controls to mock that up. I anticipated this eventuality and started cleaning my triple clamps two weeks ago. I don’t need to rebuild the forks yet, but dismantling the forks gave me the ability to use the old fork tubes with the triple clamps for future test fitting of the clip-on bars. That said, I’m not in a position to begin fabrication of these parts just yet. As of now, I’m looking at the beginning of November to start that phase of the project.
The fuel tank is coming along. Unfortunately, stripping the paint uncovered body filler. I knew the tank had some dents, and I knew that the tank had been painted before, I just didn’t know that it was dented up badly as it is. I may grind the filler out, pull the dents, and then refill. Or I might just patch up the filler. I haven’t decided yet. No matter the scenario, the tank will have to be painted, so the stripping continues. Expect some pictures of this next week.
For the month of October I will be working on a myriad of things. First off, I want to start listing and selling some of the parts that I no longer need. This will help fund my upcoming purchases and clear some space in my single car garage/workshop. I also want to finish paint stripping the frame, refurbish the switches and controls, source front brakes, rebuild the rear brakes, and start rebuilding the wheels and hubs. It’s a long list, but I am already excited to make progress on these parts!
This weeks parts list:
- ProX Piston Kits (2) – EconomyCycle.com – New
- Athena Complete Gasket Set – EconomyCycle.com – New
- RD350 Complete Clutch – eBay – Used
2 Responses
Mike Nixon
Chris, you still rebuilding RFY shocks? May have a set for you to do.
Chris
Hi Mike,
I am still performing rebuilds! I just moved into a nice new heated shop as well!
Regards,
Chris